Showing posts with label Thrifting Treasures. Show all posts

Sunday, July 1, 2012

Squishy Top Mason Jar with Chalkboard Labels!!!

So the other day I guest posted this tutorial over at C Squared W, and I decided to share it here too - so those of you that missed it can still get your craft on!

This tutorial is for fun craft storage - the squishy top mason jar with a chalkboard label...

Supplies:

  • Mason Jar (for larger label, get one without writing)
  • Chalkboard paint, paint brush
  • Masking/painter's tape
  • Fabric (about 10 sq. inches)
  • Stuffing (I took apart an old pillow...)
  • Hot glue gun and scissors


(You will need to do about 3 layers... for prepping the paint, read the directions for your particular paint)

You need a large circle about 2 times larger than the pop-out section of your jar's lid
You also need a small circle just smaller than the pop-out section

You need to glue the large piece almost all the way around (see below) and then stuff in the stuffing... then finish gluing.

Then you glue the smaller piece on to finish up...

Stuff the pop-off part back into the jar lid and that part is finished!

Then fill your jar, label it with the contents and be happy with your next project... Clearly I have a few of these... in which I store: glue sticks, "Bitty Bow" pieces, buttons, bobby-pins and feathers.


Hope you all have fun trying this at home! I'd love to see what you come up with!

Thursday, May 3, 2012

The Silver Table Make-Over

Sometime last week in the process of getting ready/ going crazy, planning for the craft fair this weekend - I realized that I could potentially use some of the furniture I already owned (much better than having to buy foldaway things and find out where to keep them later).

So if you remember the lovely (cute, but ugly stained, dirty and gross) table I misguidedly spray painted silver last year - it was the piece of furniture that got the make over...

This is what it looked like before it was silver... lies, I don't have that picture. But it was a cream color that was all stained yellow...

Then silver, it was shiny and turned your hands silver when you touched it... not awesome, when I moved into my current apartment I covered it with a scarf and hid it in a corner.


Then I painted it (notice my professional old sheets and paper plate system)... with the same white paint that has come in handy for the entertainment center and dresser I use in my craft area. It's amazing what a 7.00 can of paint can do, with an equally expensive can of Poly finish (water based, water based, water based... the oil  based poly will turn your white a bright pastel Easter egg yellow).


The skirt is stapled onto the sides and back, it's hemmed on all sides for a nice finish... the front is on a tension rod so that it can slide open. 

**So the moral of the story is, there is a good chance that you will take something and make it uglier before making it cute - there is potential in every piece of furniture, and it's usually quite easy to find!


Tuesday, February 7, 2012

DUVET! DUVET! DUVET!

Sorry, I felt that the post called for repetition, and exclamation points!!! Because I am just that stoked about it! Also I still use the word stoked...
     Okay first off, this post is about a re-vamp of my old "spring" duvet, back when I was going for the whole neutral look for the boy at the time - yeah well needless to say that is not an issue anymore as can be seen with my "winter" duvet... which I love! Yep, that did take FOREVER to cut, organize, lay out, sew... sew... sew!
     Now, this is my old duvet - boring right? But for 35.00 from overstock for a King, can't beat it... but you can dye it! And dye it I did... 3 times actually because the first was way too light grey, the second wasn't dark enough and I stopped when try 3 took me from grey to purple. 

     But alas, the recipe for Charcoal Grey should be 1 cup salt, washer of hot water, 1 tablespoon of royal blue RIT liquid dye and 1 tablespoon of black for every 2 lbs of fabric.

     I also bought some white lace to dye and sew over the blue outlines on the duvet... how cute is that lace pattern? Tell you what for 27.00 it had better be cute! (Note, please add tan to this, or it will be way too bright yellow).

     Now once everything is dry, ironed and ready to go... sewing time - which was sooo frustrating when I got up onto the top row, because the whole duvet was crammed up into my sewing machine - not conducive to sanity...
Now... after much patience it is time to put it, wait for it, wait for it... all together on your bed! 


Then you add pillows and a West Elm duvet [that you snagged for, FREE due to a gift card perk thing from Apartmentfinder] (for the other comforter you keep at the foot of your bed, because you are ridiculous like that)...

Hope you enjoy my new covers as much as I do!!!

Sunday, January 1, 2012

New Dresser... Redo

So yesterday while debating on a 100.00 side table (that I can't afford) from World Market... I found a dresser at the thrift store down the street - thinking I could use this in my new craft area and use my printer stand (a side table) as an actual side table in the living area... a whopping 2 feet from where it currently was.

So yes, I bought a new piece of furniture to redo.. which is problematic, since I will have to try to move it... or part with it when I move in May (fingers crossed everything fits, it makes me sad when I spend time working on things that I can't keep).

This is what the dresser looked like in the thrift store - and it was filled with spiders, and it was gross... but for 24.95, it had too much potential to turn down.


So after using the paint I already had from redoing the entertainment center, and purchasing... wait for it 10.00 in spray paint for the handles and as primer... I finished the dresser tonight - and the whole project was a whopping 35.00, I'd say that's not too shabby.

Hopefully when I move I can use both this cute little dresser and my current entertainment center in my bedroom, which is awesome - because they match and I am sooo excited to hopefully add another smaller dresser like this one and use both as side tables next to the bed - I am a big fan of statement pieces.

Remember, there is always potential in a shabby, grimy piece of furniture that is hiding at the hole-in-the-wall thrift store down the street. 


Friday, December 30, 2011

Craft Area...

Don't forget to follow my blog!  I have had 760 page views this month so I know ya'll are looking - just hit the little follow button, having more than 19 would be super!  You also get free swag! But that ends JAN 1st!
life rearranged

     So a few weeks ago I mentioned that my craft area needed a re-do... and that it did!  I just got home last night, and couldn't help but make a huge giant mess in my apartment before unpacking from Christmas!

     But anyway - I went to HobbyLobby today and bought a bunch of their "unfinished" wood products, and painted them white - thus I got 3 shelves for $6.00 (total), quite nice considering I already had the white paint... I also bought 2 frames... plus some supplies, and I didn't do too badly in the money department.


My unused desk area - since I've moved into this apartment, I've been using my kitchen table as a study area.

My new re-vamped desk/ craft area, I also swapped out my craft book shelf for my study shelf, so that everything is in one area - no more walking all over the apartment to get supplies.
My mailing center, (color organized) fabric shelf, and organized craft boxes.

     There will be better pictures eventually, but I felt that this summarized what I did this week - even though I only did it today - but 90% of that fabric was added to my collection this week... and this area was researched via pintrest and blogs for a bit... so I'd say that's really what I did this week...

     I mean I also spent my last few days at home before flying back to Baton Rouge... about 2 weeks before school starts to re-stock my shop, promote my shop, hopefully get another Brick & Mortar... and maybe even a job that actually pays me ;)


Saturday, December 3, 2011

Craft Area Redo

     Alright - so my craft space... which is just a bookshelf in my dining/living room is in need of a serious redo. It's terrible, so ugly and unsightly... but I don't know what to do about it.  


     The bookshelf is bad... usually a little more orderly, but the problem is that when I start crafting it all moves to the coffee table which then turns my living room into the nightmare below.


     I am debating moving all my crafting over to my desk area, but then I can't watch the Tv... so I'd have to turn the desk around, which wouldn't fit... issues issues issues. I will have a craft room of my very own some day - and it will be amazing!


****Remember all new followers this month will get a free present from my Etsy shop!

Wednesday, September 7, 2011

The "Entertainment" Center

Lately I have been in unrest with my apartment. It felt empty and needed a little bit more "personality" especially in the "living room" area.  I have been internet stalking all kinds of sites for inspiration, which is fine... if you live in a place where furniture can be readily found at the low price of "cheap" to fix up.  In Baton Rouge the only place that has said furniture is the Salvation Army out on Airline... a 20+ minute drive away, over 2 freeways, under a few more freeways, past the wrong side of the tracks, then a little further. 


I went to the Salvation Army looking for a dresser for my bedroom, so of course that's not what I found. I found a dresser that I thought I could do something with since it looks like a few things I've seen on DesignSponge lately.  So of course I had to consider this. It's a good thing I did consider it, because the 70$ dresser had been there for over a month - which at the Salvation Army means 25% off! So 49.00, two helpful movers and a dresser later I was on my way home! 


My apartment was not equipped for this project and I spent the next week and a half tripping over, falling over and at times crawling over the pieces of furniture now scattered about my apartment. Getting the dresser into the apartment was only a slight challenge, as the men made the task look easier. My good friend, Megan, and I soon discovered that this task would involve removing all 9 drawers (easier said than done) from the dresser while it was still loaded in the back of the Piñata (the 2004 Mitsubishi Endeavor lovingly named by my father as it has been hit more times than a piñata at a birthday party).


 This is the dresser, now wiped, washed, vacuumed (no joke), and cleaned... also sanded, then re-wiped and cleaned some more.
 This is the dresser in between what I would guess are coats 3 and 6 of the painting process. 
 All white was not an option that I thought would look this bland... it needed something to kick it up. That something I discovered was not: teal or brown, but rather "Arctic Ice" yeah, the name was that epic. Also, if you want white paint to remain white - make sure your sealant is WATER based, or it will turn a lovely shade of pastel yellow (as discovered with the dining room table).
 The finished product! It now is home to my TV, and the drawers hold all of my movies, games, and tools - with a whole 4 drawers to spare. The cabinet is hiding 3 more drawers, hence the 4 drawers to spare!

And that is my new "living room" entertainment center. I love it! It goes great with my new Craigslist plush chair for *15$ which is soon to have its own brown slip cover (courtesy of Overstock.com).

Monday, July 4, 2011

The Latest Furniture Addition

So. Despite popular belief, while fun, spray paint is not without its challenges. For example, I bought this adorable table on Craigslist to use as a TV stand... it was a whopping $30 because I had to pay extra to meet half way. Any-whoo... I thought I might paint it a nice gender neutral gray, so I bought one can of primer and one can of Aluminum matte spray paint...

The one can of primer didn't cover the entire project - which I did not prepare, but in hindsight should have sanded.  But never mind the primer, I was ready with my GRAY paint... so I put my finger on the trigger and low-and-behold it was SILVER. But I loved it, yet... gender neutral flew out the window. But not to worry I was ready to finish it off with my one can of spray paint and put it inside... three coats later it was finished and ready to go.

So. Just so you know:
1. Prepare your project first, a light sanding to get off chipped paint never hurt anybody
2. Check the paint before you buy it (everyone else has)... it will be better than being surprised.
3. 1 can will not be enough... if you don't get 2 cans, you will probably run to Walmart on a Saturday at 1pm, hoping that it doesn't rain on the table you left uncovered on the patio - only to make it home 20 minutes, 2 cans and a quick dry off later.


4. Just go with it. If you don't like it buy another 3 dollar can (or 2...)

Friday, July 1, 2011

Dining Room Make Over

     Over the past few months I have been collecting random chairs, in search for the perfect table so that I could paint them up and finally have a proper dining room. The chairs that I found cost: 7.00, 7.00, 4.95 and 3.95 at the local thrift store. Where I really splurged was the old poker table that I bought for 39.00 from Goodwill. I used wall paint that was left over from the samples I had bought last year when thinking of painting my walls.
I love this chair when I bought it for 7.00, it had a very terrible mustard yellow covering on the seat, and I just threw on some fabric I had in my craft room. 

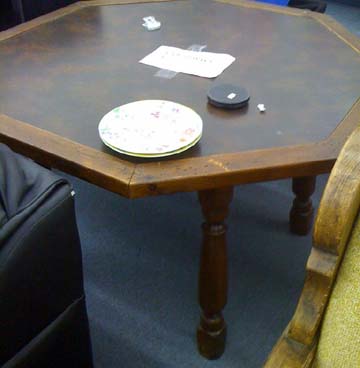
This is the poker table that I bought from Goodwill for a whole 39.00.

This chair was the other 7.00 chair, this is it with the primer grey on it.

This is my favorite chair again, with the primer grey paint on it.

I loved the leather look of the laminate on top of the poker table, so I decided to leave it and paint the rest of the table white.

It took a few coats... which were then covered in Poly... which turned the white a nice Easter egg yellow... so I then had to throw on three more layers of white - exterior paint, and then not seal it - to make sure it actually stayed white.

And the finished table. The chairs are all finished in a matching brown snake-skin type cotton material. To match the top of the table. 


      I am so excited how this turned out. It goes so cute with the purple dining room - so cute in fact, that I have decided when I move in a few weeks my new dining room will also be painted with this lovely purple color.


LinkWithin

Related Posts Plugin for WordPress, Blogger...