Wednesday, May 16, 2012

Little Waterlilly in a Big Pond - Guest Post!!!

Hey all, today I am doing a guest-post swap - you should definitely check it out!

Hello Artsy Anthropology Readers! My name is Leigh-Ellen and I blog over at Little Waterlily in a Big Pond. I'm so excited that Paige is turning over her little piece of the internet to me today. I love to travel and the title of my blog references that in some ways my life is divided between two sides of the big pond that is the Atlantic Ocean.

I spent a year living in the Austrian Alps a few years back (ok, more years than I'd like to admit) and have visited a couple of times since.  It's breath taking all year round and I particularly love the combination of old traditions and modern society... and the baked goods!

The little town of Mittersill that I lived above
Krimmel Waterfall in Summer
Krimmel Waterfall in Winter
Hintersee
Austrian Couple celebrating the return of the cows from the Alpine Pastures (it's a big parade and festival)
Goods at the Christmas Market in Salzburg
Hallstat
Hallstat- Can you imagine living with that view from your house??
Zell am See
All of these places were day trips from where I lived.  We were pretty spoiled.  We'd actually discuss which time of year we liked the mountains best (Spring and Fall when there was still alot of green but a good amount of snow on the peaks).  As a Canadian I'm used to measuring snow in depth not in altitude.

One of my favourite foods in Austria was Kaiserschmarrn (translated as Kaiser's Mess).  It's basically like scrambled pancake that you top with powdered sugar and have with apple sauce or lingongberry (like little cranberries but slightly sweeter) sauce.  It often has raisins (the Austrians and Germans do love those raisins) but I hate those so I leave them out! The best part is that it's considered a main course! At least it was where I lived! Totally the best for a Breakfast for Supper kind of mood. I don't have photos (was generally busy eating it) but feel free to google it... there are tons of recipes out there but they seem to make it more complicated than it needs to be.

Ingredients

6 Eggs
200 g pastry flour
50 g sugar (though really to taste)
250 ml milk
pinch of salt
raisins to taste (or skip those cause they're yucky)
butter
powdered sugar

Separate the egg white from the yolks. Mix the yolks, sugar, milk and flour. Whisk the egg whites and add pinch of salt (You can totally throw it all in together and still make it work out pretty well but that's the way you're SUPPOSED to do it). Once egg whites are stiff fold in the egg yolk mixture. Melt butter in large frying pan, pour in the mixture.  Sprinkle in those raisins if you really must.  Cook like you would a pancake but once you've flipped it tear it into pieces Sprinkle with powdered sugar and serve with whatever you want.

Thanks for letting me visit with you today!!

Tuesday, May 15, 2012

Thai Peanut Chicken and Noodles


I love Thai food, the flavors are just so yummy! Some of them are hard to reproduce at home, but not the peanut-chicken - love it!

This recipe is quick, easy, filling and makes enough for left overs!

What you need:
2 tablespoons soy sauce
2 tablespoons water
1 tablespoon peanut butter (I like crunchy)
1 table spoon honey
Juice of 1 lime (not completely necessary)
1 tablespoon of minced garlic (looks like a nubby root, found with veggies at store like cucumbers)
2 cloves minced garlic
1/2 to 1 tablespoon red garlic pepper flakes (depends on how spicy you want it)
1 tablespoon vegetable oil
4 boneless chicken breasts (about 1 pound) - cut into about 1 inch pieces
Snow peas, broccoli, zucchini, water chestnuts (all go well in this)

Linguine or spaghetti noodles


What you do:
1. Cut chicken into cubes and put into a deep frying pan you've preheated some olive oil in.
2. Bring a pot of water to a boil. Add noodles.
3. Make the sauce by combining all the ingredients in a microwave safe bowl and microwaving for about 30 seconds, this will melt the peanut butter enough to mix everything together.
4. Once the chicken is almost cooked, add your veggies for a few minutes. Add the sauce as well so that the veggies and chicken can get evenly coated.
5. Once the noodles are all done, mix everything together and serve.

Wednesday, May 9, 2012

Hello, goodbye

So, while this might be my last night in Baton Rouge, it's bitter sweet. I cannot wait to leave this place, with its humidity and large mosquitoes, and cockroaches (eww)... ohhh, but the food is quite yummy.

But I have been here for 2 years and made a few really great friends that I will miss, might even consider coming back to visit them sometime - that's how cool they are!

Anywhooo.... so my mom got here today, love her - but the moving might just kill me, haha. There's the whole "oh, you're not as packed as you should be", "well you can't just expect to do this in a few days"... but remember now, I spent the last 2 weeks preparing for that BOMB of a craft fair (more on that in a later post)... and then spent all weekend there, only had 2 days to pack up everything - I think I did pretty good considering.

Alas, the sofa, entertainment center and craft studio spaces are all packed away and loaded in the truck... tomorrow the bedroom and kitchen - and DONE! See, I don't think it will be that bad - oh well... that's just my opinion, but we can definitely wake up at 8, and be done in a few hours no biggie.

I might be blogging from the road, I might not - totally just depends... but I will definitely be posting to Instagram and Twitter (@artsyanthro)...

Peace out homies (sry, it's that kinda night).

Also, because you're wondering... I am moving from Baton Rouge to Reno, Nv... because I have finished my masters degree and am now looking for work - during this time I will be living in my dad's guest room (yikes, I always said I would never live with my parents, but when they stop paying rent, few options exist).

We are planning on stopping in: Shreveport, La - Wichita Falls, Tx - Santa Fe, Nm (For a day or 2) - Las Vegas, Nv and then RENO.


Thursday, May 3, 2012

The Silver Table Make-Over

Sometime last week in the process of getting ready/ going crazy, planning for the craft fair this weekend - I realized that I could potentially use some of the furniture I already owned (much better than having to buy foldaway things and find out where to keep them later).

So if you remember the lovely (cute, but ugly stained, dirty and gross) table I misguidedly spray painted silver last year - it was the piece of furniture that got the make over...

This is what it looked like before it was silver... lies, I don't have that picture. But it was a cream color that was all stained yellow...

Then silver, it was shiny and turned your hands silver when you touched it... not awesome, when I moved into my current apartment I covered it with a scarf and hid it in a corner.


Then I painted it (notice my professional old sheets and paper plate system)... with the same white paint that has come in handy for the entertainment center and dresser I use in my craft area. It's amazing what a 7.00 can of paint can do, with an equally expensive can of Poly finish (water based, water based, water based... the oil  based poly will turn your white a bright pastel Easter egg yellow).


The skirt is stapled onto the sides and back, it's hemmed on all sides for a nice finish... the front is on a tension rod so that it can slide open. 

**So the moral of the story is, there is a good chance that you will take something and make it uglier before making it cute - there is potential in every piece of furniture, and it's usually quite easy to find!


Wednesday, May 2, 2012

Not What I Wore...

**Okay ... It's RAINING outside, like stand in the shower fully dressed raining... which when I got home today I had to peel off my clothes - the only dry spot was 2 square inches at the ankle of each pant leg... which were inside of my rain boots (they do no good when filled with water). I was also wearing my North-face Shell, but that didn't help, since it was raining slightly sideways.

Alas, I am home, showered and in sweats... I have some wonderful AMAZING friends coming to help me get things organized for my craft-fair set up tomorrow - so while I sew, they will be doing tags, bags and what not.  Also, I bribed them with P.F. Chang's take out, and am soooo excited about that!


But since it's Wednesday, thought I'd give you an outfit...  Yes, it was definitely a sexy Tuesday up in my apartment! The hair, not working for me, the skinny jeans (only clean thing I had), the shirt, well it's the Beatles so that automatically makes it pretty awesome.


Tuesday, May 1, 2012

Tutorial Tuesday: Sunglasses Case


Welcome to the first Tutorial Tuesday over at ArtsyAnthropology!  Today's tutorial is super quick, and turns out pretty darn cute!  You can use scraps for it as well, so it makes a great use out of what you have lying around.

What you will need to make a Sunglasses Case:

You will need: 
2 pieces of fusible lining 9X5 inches (yes it's spelled wrong in the picture...)
2 lining pieces 9X5 (if using scraps, just has to be 9X5 finishes)
2 outer pieces measuring a total of 9X5...
I used 2 outer pieces: 3.5X5 and 6.5X5

Place the lining pieces, right side together, sew along the long sides. You will leave 1 end completely open, and sew the corners of the "bottom" edge, stopping where I left the red lines (squint to see them), so that you will be able to turn the whole piece right-side out when you're done.

Sew your two front pieces together so that you end up with 2 pieces that are 9X5, then iron flat. Then iron on fusible lining.

I sewed along either side of my fabric seam, this not only adds flair, but helps to secure the lining. It's entirely up to you how fancy you get with this... I do not have "mad skills" and thus made it simple.

Turn your outside pieces, right-side together and sew all the way around 3 sides, leaving the "top" completely open.

Now, turn your lining piece right-side out, and stuff into your outside pieces - you should have the printed side of both fabrics facing each other.

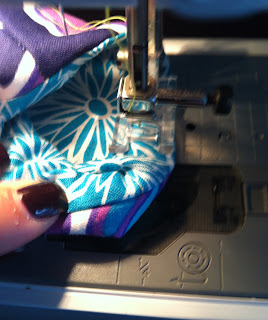
Perfect. Now, if you can get this to somehow fit in your machine, you're golden. You will sew all the way around the top of your case to stick the lining to the outer fabric. 

Now it will look like this...

Pull the whole piece right-side out using the hole you left in the bottom of the lining... once this is done, sew the bottom of the lining shut.

Stuff the lining down into the bag, and sew a final edge around the top (this helps everything stay put).

And, drum roll, you now have your completed sunglasses case. It's cute, practical and super easy to make!

See they just plop right on in there. If you want to get all fancy you can secure the top with a button, snap or even Velcro


I would love you see what you all make - leave links to your photos in the comments! Hope to see you next Tuesday...and if you have a tutorial you would like to share, please feel free to do so!


LinkWithin

Related Posts Plugin for WordPress, Blogger...